This post may contain affiliate links or ads and we may earn a small commission when you click on the links at no additional cost to you. As an Amazon Affiliate, we earn from qualifying purchases. This is at no additional cost to you and helps with our website expenses.
Seniors, you don’t need to be a tech whiz to make the most out of your iPad! All you need is our list of easy iPad tips for seniors. It’s the perfect way to get started on your journey of discovering all that your iPad has to offer!
From surprising features like LED Flash for Alerts and Home-Click Speed, to fun ways to stay connected with friends, family and colleagues, there’s something for everyone on this magical device.
Learn how to adjust settings, and find new apps and features. These simple pointers will quickly become indispensable for any tech-savvy senior. Be sure to share these iPad tips for seniors with your friends. They’ll be glad you did and soon you’ll all know more than your grandchildren 😉

50 iPad Tips for Seniors: Unlock the Power of Your Device
Whether you’re just starting out or a seasoned pro, these tips will help you get the most out of your iPad. So get ready to master your tablet and have some fun along the way! We’ll show you how to set up your iPad for the elderly.

#1. Use Siri to set reminders and alarms.
Unlocking the power of your iPad just got a whole lot easier! Just press and hold the Home button to activate Siri, or simply say “Hey, Siri” if you have enabled this feature in Settings > Siri and Search.
Then it’s time to set alarms or reminders. For example, if you want to make sure you don’t forget about picking up milk at 8PM, just tell Siri: “Remind me to pick up milk at 8PM” and it will be taken care of for you! No more worrying about forgetting about important tasks!

#2. Adjust text size and font for easier reading.
This is one of the most frequently used iPad tips for seniors. To adjust text and font size on your iPad for easier reading, you can use the built-in accessibility settings. To access these settings, navigate to Settings > General > Accessibility > Larger Text.
From there, you can select the text size you want and it will be applied throughout your device. You can also use third-party apps or browser extensions that provide additional font options.
#3. Use the magnifying glass to zoom in on small text or images.
To use the magnifying glass to zoom in on small text or images on your iPad, open the Magnifier feature by navigating to Settings > General > Accessibility > Magnifier.
Then, from the Magnifier switch it on and use the triple-click Home button shortcut to launch it. Once in Magnifier mode, you can pinch your fingers together or apart on the display to zoom in or out for easier viewing.
We think you’ll be using these iPad tips for seniors quite frequently once you get the hang of it.
#4. Use the Speak Screen feature to have text read aloud.
Ready to talk your way through your iPad? Then you’re in luck! Simply head over to Settings > General > Accessibility and turn on the ‘Speak Screen’ option.
You can then access this feature anytime simply by swiping down from the top of any screen with your two fingers—how cute is that?! Your iPad will then read the text aloud and make it easier than ever to understand what you’re looking at.
#5. Use the AssistiveTouch feature to assist with physical dexterity.
AssistiveTouch is an accessibility feature on the iPad that helps users with physical dexterity perform common tasks like tapping, swiping, pinching, and more. It adds a floating button to the screen for easy access, and you can customize it to access various settings as well.
To use the AssistiveTouch feature to assist with physical dexterity on an iPad, navigate to Settings > General > Accessibility > AssistiveTouch and turn it on. This will add a floating button on your screen that you can use to perform tasks like tapping, swiping, pinching, and more. You can also access various settings by selecting ‘Customize Top Level Menu’.
#6. iPad Tips for Seniors: Use the Dictation feature to type with voice commands.
The dictation feature on an iPad allows users to type with voice commands. To enable it, go to Settings > General > Accessibility > Dictation and turn it on. After you have enabled the feature, simply press the microphone icon on your keyboard and start speaking. The words you say will be automatically converted into text.
#7. Use the built-in accessibility features, such as closed captions and audio descriptions.
To use the built-in accessibility features on an iPad such as closed captions and audio descriptions, go to Settings > General > Accessibility. From there, you can enable various settings like closed captions, audio descriptions, caption size/fonts, speaker volume and more.

#8 Use the “Find My” feature to locate a lost or misplaced iPad
Need to find your iPad-but can’t figure out where it is? No need to worry! With the “Find My” feature on iPad, you can locate your device and lock remotely if it’s lost or stolen.
To get started, just head to Settings > [Your Name] > iCloud and make sure “Find My” is enabled. Then just go to iCloud.com/find from any web browser and log in with your Apple ID. Before you know it, you’ll be able to easily locate any device linked to your Apple ID—how cool is that?!
#9. Use the “Guided Access” feature to limit access to certain apps or features.
The “Guided Access” feature on an iPad is a tool that allows users to limit their device’s use to a single app. To enable it, go to Settings > General > Accessibility and select “Guided Access”. Once enabled, users can triple-click the home button while using an app to lock the device in this mode.
Senior citizens might want to use this feature if they have difficulty navigating between apps or need assistance focusing on one particular task.
#10. Use the “Night Shift” feature to reduce blue light and ease eye strain.
The “Night Shift” feature on an iPad is a tool that reduces the amount of blue light emitted from the display. Blue light can interfere with circadian rhythms, making it harder to fall asleep and stay asleep. Enabling this feature can help older people get a better night’s rest.
To enable it, go to Settings > Display & Brightness > Night Shift. You can also schedule Night Shift to automatically turn on and off at certain times or adjust the color temperature as desired.
#11. Use the “Mono Audio” feature to balance left and right audio levels.
The “Mono Audio” feature on an iPad is a tool that combines the left and right audio channels into one. This allows those with hearing loss in one ear to adjust the sound to hear both channels evenly.
To enable it, go to Settings > General > Accessibility and select “Mono Audio”. This feature can be especially helpful for elderly people who have difficulty distinguishing sounds coming from different directions. It is a little-known feature but one of the best iPad tips for seniors!
#12. Set up iPad for the Elderly. Use the “VoiceOver” feature for spoken descriptions of what’s on the screen.
The “VoiceOver” feature on an iPad is an accessibility feature designed to help those with visual impairments. It gives audio feedback as you interact with the interface, allowing senior citizens to use their devices more effectively.
To enable it, go to Settings > General > Accessibility and select “VoiceOver”. Once enabled, you can use simple voice commands to navigate your device.
#13. Use the “Switch Control” feature to navigate the iPad with a switch or other adaptive device.
The “Switch Control” feature on an iPad is designed to assist those with physical or motor impairments. It allows device navigation and interaction through external switches, switch interfaces, or eye-tracking movements.
This feature can be beneficial for older people who have difficulty using their hands to tap, swipe or pinch the screen.
To enable it, go to Settings > General > Accessibility and select “Switch Control”. Once enabled, you can set up different control options depending on your needs.
#14. Use the “Zoom” feature to magnify the entire screen
The “Zoom” feature is surely one of the best iPad tips for seniors as it allows them to see text or images more clearly, even if they have eyesight difficulty. It enables users to enlarge anything displayed on the screen.
It can be enabled through Settings > General > Accessibility > Zoom. To use this feature, simply double-tap and spread two fingers outward on the screen at the same time. With this iPad tip, seniors can access content easily, without straining their eyes in any way.
#15. Use the “Invert Colors” feature to change the color scheme for easier reading.
The “Invert Colors” feature on an iPad allows users to change the color scheme of the device, inverting bright colors to dark and vice versa. This can be beneficial for older people with eyesight issues as it reduces glare and increases contrast.
To enable it, you navigate to Settings > General > Accessibility and select “Invert Colors“. Once enabled, you can adjust settings to your needs such as choosing between classic inversion or smart inversion which affects images more selectively.
This is one of the lesser-known iPad tips for seniors. However, it is one we think you’ll find quite useful.
#16. Use the “Shake to Undo” feature to undo typing or other actions quickly.
Have you ever been typing on your iPad and made a mistake? Don’t worry, the Shake to Undo feature has got your back! Just gently shake your iPad and a pop-up will appear with an option to Undo the last action – it’s that simple!
To enable this helpful feature, go to Settings > General > Accessibility > Shake to Undo. So, now you can make all the typos your heart desires without worrying about undoing them one at a time.
#17. Easy iPad Tips for Seniors – Use the “Bold Text” feature to make the text more prominent.
The Bold Text feature on an iPad offers users the ability to increase the weight of their font, making text appear thicker and easier to read. This can be especially beneficial for older people with limited vision, as it increases readability and makes navigating the interface of their device easier.
To enable this helpful setting, simply go to Settings > Display & Brightness > Text Size & Bold Text and toggle Bold Text. Now you’re ready to enjoy bolder fonts!
#18. Use the “Increase Contrast” feature to make text and images more distinct.
The Increase Contrast feature on an iPad is a great way to make text and images stand out more distinctly. It increases the difference in color between foreground and background, making it easier to read text and distinguish details in images.
This can be particularly beneficial for seniors with poor vision, as it makes navigating the interface of their device much easier.
To enable this feature, go to Settings > General > Accessibility > Increase Contrast and toggle it on. You’ll now be able to make full use of your iPad’s features with crisper visuals!
#19. Use the “Reduce Motion” feature to reduce screen animation and motion effects.
The Reduce Motion feature on an iPad reduces the amount of motion and animation when using the device. This can be especially helpful for people who experience dizziness or nausea from animations, as it eliminates these effects altogether.
To enable this feature, simply go to Settings > General > Accessibility > Reduce Motion and toggle it on. Now you’ll be able to use your iPad without any unwanted motion or animations getting in the way!
#20. Use the “On/Off Labels” feature to add labels to buttons and other controls.
The On/Off Labels feature on an iPad allows you to add text labels to buttons and other controls, making it easier for senior citizens to navigate the interface of their device.
It’s also helpful for people who rely on Assistive Technology such as screen readers, as they can understand the purpose of each button more easily.
To enable this feature, go to Settings > General > Accessibility > On/Off Labels and toggle it on. Seniors or anyone using Assistive Technology can make full use of their iPad’s features without any hassle.
#21. Use the “Speak Selection” feature to have text read aloud.
The Speak Selection feature on an iPad allows you to have any text onscreen read aloud by your device. This can be helpful for elderly people who may have difficulty reading the smaller text on their devices, as they can hear it instead.
To enable this feature, go to Settings > General > Accessibility > Speech and toggle the Speak Selection button to “on”. Now, when you select a piece of text, you will be able to have it read aloud with ease.
#22 Use the “Speak Screen” feature to have text read aloud – iPad Tips for Seniors
The Speak Screen feature on an iPad allows you to have the entire screen read aloud, whereas the Speak Selection feature only reads a single selection of text at a time. This makes it easier for elderly people to understand what is on their screen, as they don’t need to pick out individual pieces of text.
To enable this feature, go to Settings > General > Accessibility > Speech and toggle the Speak Screen button to “on”. Now your device will be able to read everything onscreen without any hassle.
#23. Use the “Call Audio Routing” feature to route phone calls to a speaker or headset.
The Call Audio Routing feature on the iPad allows you to easily switch between listening to an audio call through your device’s speakers or headphones. This is great for senior citizens who may not have a headset handy, as they can just switch back and forth without missing any of the conversation.
To enable this feature, go to Settings > FaceTime > Audio/Video and toggle the Call Audio Routing button to “on”. With that done you will be able to route your audio easily between headphones and the device’s speakers.
#24. Use the “LED Flash for Alerts” feature to use the camera flash as a visual alert.
The LED Flash for Alerts feature on the iPad is an excellent tool for seniors, as it can provide a visual alert whenever they need to be notified of something.
This feature allows you to use the camera flash as a visual alert, so that even if seniors are in sound-sensitive environments or have difficulty hearing their device’s audio alerts, they will still be able to know when they receive notifications.
To enable this feature, go to Settings > General > Accessibility > Hearing and toggle the LED Flash for Alerts button to “on”. Now your device’s camera flash will serve as a visual alert whenever needed!
#25. Use the “Home-Click Speed” feature to adjust the speed at which the home button is pressed.
The Home-Click Speed feature on the iPad really makes sure that it knows exactly how fast you want to press the home button! For seniors, this is a great perk – no more accidentally double-clicking when all they wanted was to go back to the home page.
To adjust this setting, go to Settings > General > Accessibility and toggle the Home-Click Speed button up or down according to preference. This way, seniors can make sure that their iPad responds as quickly as they want it to!
#26. iPad Tips for Seniors, Use the “Auto-Brightness” feature to automatically adjust screen brightness.
The iPad’s Auto-Brightness feature is a great tool for seniors as it helps to automatically adjust the screen brightness with its built-in ambient light sensor!
To turn it on, just go to Settings > General > Accessibility and make sure Auto-Brightness is enabled. Once set up, your device will adjust its brightness automatically—no more fiddling with settings!
#27. Use the “Ask to Join Networks” feature to control which networks the iPad connects to.
The iPad’s Ask to Join Networks feature allows users to control which networks their device connects to. This can be useful for seniors who may not be tech-savvy, as it prevents accidental connections that could leave the user vulnerable to malicious activity.
To use this feature, go to Settings > Wi-Fi and toggle the Ask to Join Networks switch to the on position. Now the iPad will prompt before connecting to any available network.
#28. Use the “Auto-Lock” feature to automatically lock the iPad after a period of inactivity.
The iPad’s Auto-Lock feature is a great way to automatically secure your device after a period of inactivity. To enable it, simply go to Settings > Display & Brightness > Auto-Lock. Pick the desired length of time for the device to be inactive before it locks itself. That way, you can make sure that your iPad always stays secure! Use this iPad tip for seniors for keeping things nice and secure.

#29. Use the “Background App Refresh” feature to control which apps are allowed to update in the background.
The iPad’s Background App Refresh feature allows apps to refresh their content in the background, so you can have up-to-date information even when you’re not actively using the app.
This helps you stay organized and up-to-date on what matters most.
To use this feature, go to Settings > General > Background App Refresh and toggle the switch to the on position. Now each app can be configured individually based on your preferences.
#30. Use the “Bluetooth” feature to connect to other devices, such as headphones or a keyboard.
The Bluetooth feature on an iPad allows users to connect to other devices wirelessly. This can be done with headphones, keyboards, and other compatible devices.
For seniors, this would make it much easier to connect accessories without needing to understand complicated wired connections.
To use this feature, go to Settings > Bluetooth and toggle the switch to the On position. Then select a device to pair with and follow the instructions on the screen. Once paired, you’ll be able to use the accessory with your iPad.
#31. Use the “Cellular Data” feature to control which apps are allowed to use cellular data.
The iPad’s Cellular Data feature allows users to control which apps are allowed to use cellular data. This is useful if you have a limited data plan or if you just want to save on your monthly bill.
To use this feature, go to Settings > Cellular Data and toggle the switch to the On position. You can then individually select which apps are allowed to use cellular data by tapping on the app and selecting ‘Use Cellular Data’.
Additionally, you can disable all cellular data usage by deselecting ‘Cellular Data’ from each app.
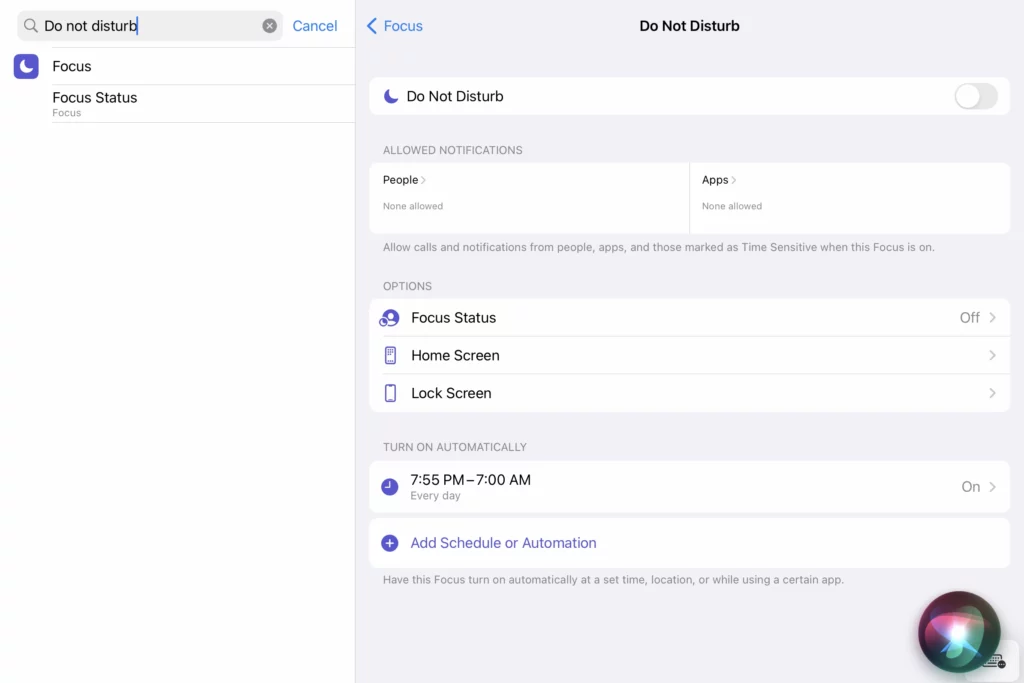
#32. Use the “Do Not Disturb” feature to silence notifications and calls.
The iPad’s Do Not Disturb feature is a great way to silence those pesky notifications and calls. For seniors, this can be particularly useful for blocking out distractions during leisure activities or when resting.
I use this setting every day and find it to be one of the best iPad tips for seniors!
To use this feature, go to Settings > Focus > Do Not Disturb and toggle the switch to the On position. You can customize when it turns on from here by setting quiet hours and managing which contacts are allowed to call through while Do Not Disturb is enabled.
#33. Use the “Notification Center” feature to view and manage notifications.
Seniors can make the most out of their iPad’s Notification Center by customizing it to their needs. To use this feature, go to Settings > Notifications and toggle the switch to the On position.
You can choose which apps are allowed to send notifications and even specify whether they appear in the Lock Screen or only when your iPad is unlocked.
For a more fun approach, why not set up a custom sound for each app? That way grandma won’t miss an important notification while also getting a good giggle whenever she gets a new message!
#34. Use the “Restrictions” feature to control which apps and features are accessible.
The iPad’s Restrictions feature is the perfect way to stay in control of what apps and features are accessible on your device.
To use this feature, go to Settings > General > Restrictions and toggle the switch to the On position. From here, you can specify which apps are allowed and blocked, as well as lock down any settings that might be too tempting!
Best of all, you can even set up a secret passcode so nobody else can meddle with your Restrictions settings. Just make sure you don’t forget it – that would be very embarrassing!
#35. Use “Safari” to browse the internet.
With iPads, it’s easy to surf the web using Safari. Just open the app and type in the URL of any website you want to access.
You can also use other browsers too – just download them from the App Store or a trusted source and start browsing away! For example, I personally like to use Chrome, but if you’re interested in finding out more about it, let me know and I can write a separate post about that!
#36. Use the “AirDrop” feature to share files and photos with other nearby Apple devices.
AirDrop is a feature on the iPad that allows you to wirelessly share photos, videos, music, and documents with other Apple devices nearby.
To use AirDrop, just open the Control Center by swiping up from the bottom of the screen, then tap on AirDrop to choose who you want to share with: either Contacts only or Everyone. You can also control what types of files you can receive or send.
There are pros and cons to using this iPad feature:
Pros
- Quick and easy way to share files and photos with people nearby
- No need for internet connection
- Can limit access to contacts only for added security
- Allows users to securely transfer data without fear of third-parties accessing it
Cons
- Only works with Apple devices
- Not all types of files can be shared using AirDrop
- Can be slow if there are too many users in the same area
- Limited to 30-foot range
- File size is limited to 256 MB
#37. Use the “AirPlay” feature to stream audio and video to other devices
AirPlay is a feature on the iPad that allows you to wirelessly stream audio and video from your device to compatible speakers, TVs, and other Apple devices.
To use AirPlay, just tap the AirPlay icon in your app (it looks like a TV with an arrow pointing up) and select the device you’d like to use.
You can then control the playback and volume on your device or on the receiving device.
Elderly people may find AirPlay useful for listening to music or watching movies when they don’t want to mess around with cables. It also makes controlling the playback or volume of media very easy since it can all be done through the iPad.
#38. Use the “Control Center” feature to quickly access settings and shortcuts.
The iPad Control Center is an accessible feature that provides quick access to commonly used tools and settings. It can be accessed by swiping up from the bottom of your screen, or by swiping down from the top right corner (if you have an iPad Pro).

The Control Center includes several frequently-used tools, such as a volume slider, audio playback controls, and brightness controls. It also allows you to connect to Wi-Fi networks, access AirPlay and AirDrop functions, control music playback on compatible devices, control media playback and more.
Additionally, it can give you quick access to shortcuts for taking screenshots, using Do Not Disturb mode, setting a timer or alarm, viewing recent apps used and even performing basic calculations.
#39. Use the “Spotlight Search” feature to search for apps, contacts, and other information.
The iPad’s Spotlight Search feature is a powerful tool that allows users to quickly search for apps, contacts, documents, and other information. To use it, simply swipe down from the top of your screen or right-click in an empty space on your home screen. Then, type in what you’re searching for.
Seniors will find this feature useful because it is quick and convenient. They will be able to locate specific items without having to scroll through pages and folders of apps or contacts looking for the right one. It’s one of the most unknown iPad tips for seniors. But you’ll soon be using it for everything!
Additionally, they will appreciate being able to look up just about anything else, such as directions and online information, with the help of Spotlight Search.
#40. Use the “App Store” feature to download and install new apps.
The App Store is an iPad feature that provides access to millions of apps. It can be found on the home screen or by swiping left on the home page.
Some good apps for senior citizens to use include:
- Brain Games: A collection of over 20 fun and stimulating cognitive games, designed to improve memory, concentration and mental agility in seniors.
- AARP Now: An app from the American Association of Retired Persons that provides resources and advice for seniors such as tips for healthy living, articles about retirement planning, discounts for members and more.
- Lumosity: A brain training program designed to improve cognitive functioning such as memory and problem-solving skills in a fun and engaging way.
Final 10 iPad Tips for Seniors!
Seniors can find plenty of useful and user-friendly features on their iPad. Here are some of the basics that everyone should know about. Although these are common, these iPad tips for seniors will make sure you are taking advantage of all the iPad has to offer.
#41. Use the “iBooks” feature to read and purchase books.
iBooks is an app on the iPad that allows seniors to access and read ebooks, listen to audiobooks, and view PDFs. iBooks can be found on the Home screen of an iPad. It looks like a white book in a blue box and can be identified by the word “iBooks” written right on top.
Here’s how it works:
- Store: You can purchase ebooks or audiobooks from the iBooks Store by entering their iTunes credentials.
- Library: Their purchased books will appear in their personal library which they can categorize into collections. They can also search for and add books found at other online stores.
- Reader: Seniors can use the reader function to adjust settings like font size, brightness, background colour and more. They can also bookmark pages they want to revisit later.
Seniors will appreciate iBooks because of its ease of use, wide array of content and convenient features such as its built-in dictionary. It is a great way for seniors to relax with a good book without ever having to leave the house!
#42. Use the “iTunes Store” feature to purchase music, movies, and TV shows.
The iTunes Store is a feature on the iPad that lets you purchase and download music, movies, and TV shows directly. Here’s how to use it:
- Browse: You can browse or search for content by categories such as genre, artist and title.
- Preview: You can preview music tracks and videos before making a purchase.
- Purchase: You can purchase individual tracks or entire albums with their iTunes credentials. Downloads will then be added to their library shortly after.
Senior citizens will appreciate the variety of content available on the iTunes Store. From timeless classics to recent chart-topping hits, there’s something for everyone! Moreover, they will enjoy the convenience of being able to instantly access their favorite songs, movies, and TV shows at any time.
#43. Use the “Photos” feature to view and organize photos and videos.
The iPad’s Photos feature allows users to sort and organize photos and videos from multiple sources, such as their camera roll, iCloud stored images, and more.
Using the Photos feature, you can:
- Browse & Organize: View, select and organize your photos with ease.
- Markup & Quick Actions: Get creative with Markup tools and apply quick actions to your photos.
- Print or Share: Print photos or share them to social media or another service.
Yes, the iPad does take pictures! You can take a picture on an iPad by opening the Camera app. If you have an iPad Pro, you can also use the TrueDepth camera system to record 4K video, slow-motion selfies and more.
The iPad also comes with advanced photo editing tools that let you enhance photos with filters and adjust exposure, shadows, hue, and many other settings.
#44. Use the “Calendar” feature to schedule and manage events.
The iPad Calendar is a great tool for managing events, schedules and tasks. It allows users to add appointments, set reminders and share their calendars with friends or coworkers.
Here’s how to use the iPad Calendar:
- Add Events & Reminders: Create events and reminders with start/end times, locations and more details.
- Invite Contacts: Invite contacts to join events or reminders.
- Share & Sync: Share your calendar with others or sync it with other devices.
The iPad Calendar can be especially useful for seniors who need help keeping track of their day-to-day activities. With its intuitive interface and easy-to-use features, it has never been easier for them to stay organized and on top of their tasks!
#45. Use the “Clock” feature to set alarms and timers.
The iPad Clock is a great tool for managing time, setting alarms, and making sure you never miss an important event. It includes the following features:
- World Clock: Keep track of time in different cities around the globe.
- Stopwatch & Timer: Use these tools to keep track of your activity times or create reminders for yourself.
- Alarm: Set alarms to wake up at specific times or set recurring alarms for everyday tasks.
The iPad Clock is a great tool for managing time, setting alarms, and making sure important tasks do not get missed. In addition to setting alarms to wake up at specific times or set recurring alarms, it can also be used to create reminders for taking medications.
The iPad Clock has an intuitive interface that makes it easy to set medication reminders quickly and efficiently. With the ability to customize timing intervals, you can ensure no dose of medication ever goes forgotten!
Seniors can rest assured knowing they will always stay on top of their medication routine with the help of the iPad Clock.
#46. Use the “Contacts” feature to store and manage contact information.
The iPad Contacts feature is a great way to store and organize the contacts you communicate with most often. It includes the following features:
- Create Contact Cards: Create cards for each contact, including their name and contact information (phone number, email address, etc.).
- Organize Contacts: Easily organize your contacts into groups or by location. You can also set up favorites to quickly find the people you need to contact.
- Unified Search: Use unified search to quickly find contacts no matter where they are stored.
The iPad Contacts makes it easy to stay in touch and keep track of important people in your life. For seniors, this can be especially useful for staying connected with family members or keeping track of important medical professionals.
With its intuitive interface and powerful search features, seniors can easily look up any contact they need without having to worry about misplacing a phone number or email address.
#47. Use the “Mail” feature to read and compose email.
The iPad Mail app is a great tool for staying connected with family, friends, and colleagues. It includes the following features:
- Send & Receive Emails: Use the app to compose emails, attach photos or files, and send without ever leaving the house.
- Organize Messages: Easily organize messages using labels, folders and filters so you can quickly find what you need.
- Stay Connected On The Go: Get notifications when new mail arrives so you never miss an important message.
The iPad Mail app makes it easy to stay connected while on the go. For seniors, this can be especially useful for keeping in touch with family members who live far away or staying up-to-date on news or events that are important to them.
With its intuitive interface and powerful organization features, seniors can easily access their emails and have peace of mind knowing they will never miss an important message again.
#48. Use the “Notes” app to take notes and create to-do lists. iPad tips for seniors.
The iPad Notes feature is a great way to stay organized and capture ideas on the go. It includes the following features:
- Create Notes: Quickly create rich text notes with images, web links, etc.
- Organize Notes: Easily organize notes into folders or by tags for easy retrieval later. Search features make it easy to quickly find notes you need.
- Share & Collaborate: Share your notes with other users or collaborate in real-time on projects with minimal effort.
The iPad Notes app is the perfect tool for seniors to stay organized and on top of their important tasks! With it, they can easily keep track of medications and appointments, jot down ideas for creative writing needs or topics for discussion during meetings and phone calls, or even record their thoughts while reading a book.
Its intuitive interface and powerful organizational features make it easy to access notes and have peace of mind knowing that nothing important will be forgotten. It’s just like having your very own personal assistant – helping you stay on top of all you need to remember in life!
#49. Use the “Weather” app to check the current weather and forecast. One of the most frequently used iPad tips for seniors.
I use this one almost daily and it is one of the easier iPad tips for seniors. The iPad Weather app is a great way to stay informed of the latest weather conditions. It includes the following features:
- Current Weather: See current weather conditions and forecasts for upcoming days with detailed information like temperature, humidity, wind speed, and sunrise/sunset times.
- Hourly Forecast: Quickly access a detailed hourly forecast for up to 48 hours in advance.
- Map View: View an interactive map of the world with details on temperature, precipitation, cloud cover, and more.
- Weather Alerts: Set up custom alerts based on location or type of alert (e.g., tornadoes, storms) so you’ll never miss a severe weather warning.
The iPad Weather app offers all the features you need to stay ahead of changing weather patterns. For seniors who are especially vulnerable to extreme temperatures or other weather events, this can be especially helpful in knowing when changes are coming and planning accordingly. The app can be found pre-installed on all iPads or downloaded via the App Store.
#50 Use the “Maps” feature to find directions and explore new places.
The iPad Maps app is an awesome way to get around with ease! It includes features like:
- Directions: Get turn-by-turn directions for driving, walking, or cycling.
- Satellite View: Zoom in and out on a high-resolution satellite image of the area.
- Traffic Info: See real-time traffic information so you can plan ahead and avoid congestion.
- Places Nearby: Find restaurants, hotels, stores, and more located nearby.
Whether you’re trying to find your way to the grocery store or need directions from one city to another – this handy app has got you covered!
It’s easy to use and organize, plus seniors can appreciate being able to quickly find services nearby that they need such as ATMs or pharmacies. The app is also available pre-installed on all iPads or can be found in the App Store.
Final Thoughts on iPad Tips for Seniors
At the end of the day, iPads are a great way for seniors to stay connected with family and friends, stay informed, and access helpful apps on the go. Whether it’s learning how to use email, video chat, or creative apps – there are so many possibilities that can make life easier and more fun! I hope these iPad tips for seniors helped make using your device easier!
With a bit of help from the Apple community or a little practice on your own, you’ll be learning all about your iPad in no time. Any questions? Ask us in the comment section below.